This text presents basic instructions to create new blocks for BIPES. As it is known, BIPES uses Blockly as its block language, so the definitions follow Blockly rules. This requires editing some files from BIPES source code.
If you don’t have access to the source code, you can download it here:
BIPES Network version (bipes.net.br/beta2/ui)
https://github.com/rafaelaroca/BIPES_ui_testing
BIPES Web Serial version (bipes.net.br/beta2serial/ui)
https://github.com/rafaelaroca/bipes_serial
We hope to merge these repositories in a near future, but they are separated now because Web Serial only works with SSL and WebREPL only without SSL (WebSockets without SSL).
The files involved are:
| block_definitions.js | This file defines the inputs, outputs, and appearance of each block. |
| generator_stubs.js | This file defines the generated code for each block. |
| toolbox_xxx.xml | As BIPES supports several boards, the file toolbox_xxx.xml refers to the information about the structure/components shown on the toolbox of a certain board. For example, toolbox_esp32.xml or toolbox_esp8266.xml |
Note that this example is “complete”, with 4 blocks and several features. You can start with simpler blocks!
Let’s create blocks for Neo Pixel RGB LED strip, to illustrate:
Step 1: Define the blocks
Open the file block_definitions.js and add the desired code at the end of the file. In the case of the Neo Pixel RGB LED strip, we will add 4 blocks:
- Init neopixel
- Write / control neopixel
- Colors by number
- Colors by color
Here are the block definitions:
//neopixel
Blockly.Blocks['neopixel_init'] = {
  init: function() {
    this.setColour(135);
    this.appendDummyInput()
        .appendField("Init neopixel");

 this.appendDummyInput()
      .appendField(new Blockly.FieldImage(
        "media/neopixel.png",
        55,
        55,
        "*"));

    this.appendValueInput("pin")
        .setCheck(null)
        .appendField("Pin");

    this.appendValueInput("number")
        .setCheck("Number")
          .appendField("Number of LEDs");

    this.setPreviousStatement(true);
    this.setNextStatement(true);
    this.setTooltip("Init NeoPixel on the specified pin");
  }
};

Blockly.Blocks['neopixel_write'] = {
  init: function() {
    this.appendDummyInput()
        .appendField(new Blockly.FieldLabelSerializable("NeoPixel Control"), "MS
G_NEOPIXEL");

    this.appendValueInput("address")
        .setCheck(null)
        .appendField("LED");

    this.appendValueInput("color")
        .setCheck("Number")
          .appendField("Color");

    this.setPreviousStatement(true);
    this.setNextStatement(true);

    this.setColour(230);
 this.setTooltip("NeoPixel");
 this.setHelpUrl("http://www.bipes.net.br");
  }
};

Blockly.Blocks['neopixel_color_numbers'] = {
  init: function() {
    this.appendDummyInput()
        .appendField("Red");
    this.appendValueInput("red")
        .setCheck(null);
    this.appendDummyInput()
        .appendField("Green");
    this.appendValueInput("green")
        .setCheck(null);
    this.appendDummyInput()
        .appendField("Blue");
    this.appendValueInput("blue")
        .setCheck(null);
    this.setInputsInline(true);
    this.setOutput(true, null);
    this.setColour(230);
 this.setTooltip("NeoPixel LED Color");
 this.setHelpUrl("https://bipes.net.br/wp/?page_id=177");
  }
};

Blockly.Blocks['neopixel_color_colors'] = {
  init: function() {
    this.appendDummyInput()
        .appendField("Color")
        .appendField(new Blockly.FieldColour("#ff0000"), "color");
    this.setInputsInline(true);
    this.setOutput(true, null);
    this.setColour(230);
 this.setTooltip("NeoPixel LED Color");
 this.setHelpUrl("https://bipes.net.br/wp/?page_id=177");
  }
};
If you are not used to JavaScript or Blockly, the Block Factory allows a quick and easy definition of “Blockly blocks using Blockly” ;-). Simple dray your block and copy the code!
So, we have 4 blocks defined:
neopixel_init
neopixel_write
neopixel_color_numbers
neopixel_color_colors
Please note that these block names are very important and will be needed and must be repeated exactly as they are in all files: generato_stubs, toolbox_xxx.xml, block_definitions.js.
Step 2: Define the generated code
We can even mix / add help javascript functions to generate our Python code:
Blockly.Python['neopixel_color_numbers'] = function(block) {
  var value_red = Blockly.JavaScript.valueToCode(block, 'red', Blockly.JavaScript.ORDER_ATOMIC);
  var value_green = Blockly.JavaScript.valueToCode(block, 'green', Blockly.JavaScript.ORDER_ATOMIC);
  var value_blue = Blockly.JavaScript.valueToCode(block, 'blue', Blockly.JavaScript.ORDER_ATOMIC);

  var code = '(' + value_red + ',' + value_green + ',' + value_blue + ')';

  return [code, Blockly.JavaScript.ORDER_NONE];
};

function hexToRgb(hex) {
  // Expand shorthand form (e.g. "03F") to full form (e.g. "0033FF")
  var shorthandRegex = /^#?([a-f\d])([a-f\d])([a-f\d])$/i;
  hex = hex.replace(shorthandRegex, function(m, r, g, b) {
    return r + r + g + g + b + b;
  });

  var result = /^#?([a-f\d]{2})([a-f\d]{2})([a-f\d]{2})$/i.exec(hex);
  return result ? {
    r: parseInt(result[1], 16),
    g: parseInt(result[2], 16),
    b: parseInt(result[3], 16)
  } : null;
}

Blockly.Python['neopixel_color_colors'] = function(block) {
  var color = block.getFieldValue('color');
  var h = hexToRgb(color);
  var code = '(' + h.r + ',' + h.g + ',' + h.b + ')';
  return [code, Blockly.JavaScript.ORDER_NONE];
};


Blockly.Python['neopixel_init'] = function(block) {
  Blockly.Python.definitions_['import_machine'] = 'import machine';
  Blockly.Python.definitions_['import_neopixel'] = 'import neopixel';

  var value_pin = Blockly.Python.valueToCode(block, 'pin', Blockly.Python.ORDER_ATOMIC);
  var value_number = Blockly.Python.valueToCode(block, 'number', Blockly.Python.ORDER_ATOMIC);

  var code = 'np=neopixel.NeoPixel(machine.Pin(' + value_pin + '),' + value_number + ')\n';

  return code;
};

Blockly.Python['neopixel_write'] = function(block) {
  var value_address = Blockly.Python.valueToCode(block, 'address', Blockly.Python.ORDER_ATOMIC);
  var value_color = Blockly.Python.valueToCode(block, 'color', Blockly.Python.ORDER_ATOMIC);
  var code = 'np[' + value_address + ']=' + value_color + '\n';

  return code;
};
Step 3: Add to the desired boards/toolboxes
Adding the created blocks to a toolbox can be as simply as the following code, which can be inserted in the most convenient part of the toolbox XML file:
<block type="neopixel_init"></block>
<block type="neopixel_write"></block>
<block type="neopixel_color_numbers"></block>
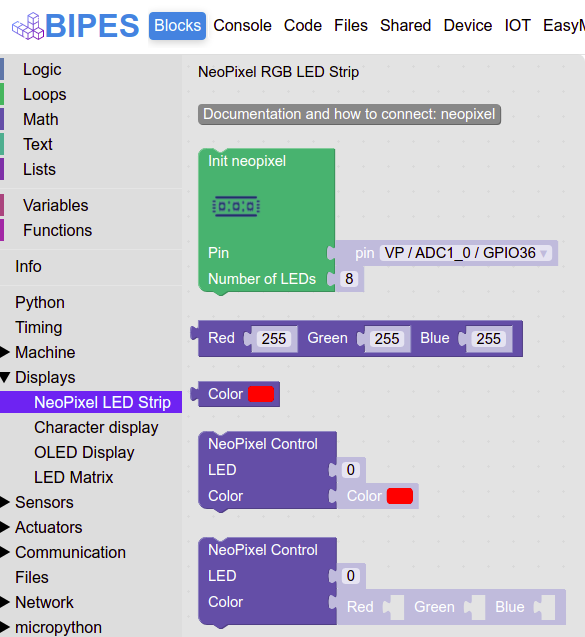
<block type="neopixel_color_colors"></block>However, it is interesting to create a special category just for NeoPixel devices. It is also interesting to have a more intuitive block connection to other blocks, with pre-inserted inputs. So, we could enhance the working, but simple code above to this one:
<category name="Displays">

<category name="NeoPixel LED Strip">
      <label text="NeoPixel RGB LED Strip"></label>

        <button text="Documentation and how to connect: neopixel" callbackKey="loadDoc"></button>

      <block type="neopixel_init">
       <value name="pin">
          <shadow type="pinout">
            <field name="Pin"></field>
          </shadow>
       </value>

       <value name="number">
        <shadow type="math_number">
          <field name="NUM">8</field>
        </shadow>
       </value>
      </block>

      <block type="neopixel_color_numbers">
       <value name="red">
        <shadow type="math_number">
          <field name="NUM">255</field>
        </shadow>
       </value>
       <value name="green">
        <shadow type="math_number">
          <field name="NUM">255</field>
        </shadow>
       </value>
       <value name="blue">
        <shadow type="math_number">
          <field name="NUM">255</field>
        </shadow>
       </value>
      </block>

      <block type="neopixel_color_colors"></block>

      <block type="neopixel_write">
       <value name="address">
        <shadow type="math_number">
          <field name="NUM">0</field>
        </shadow>
       </value>

       <value name="color">
        <shadow type="neopixel_color_colors">
          <field name="PIN"></field>
        </shadow>
       </value>
      </block>

      <block type="neopixel_write">
       <value name="address">
        <shadow type="math_number">
          <field name="NUM">0</field>
        </shadow>
       </value>

       <value name="color">
        <shadow type="neopixel_color_numbers">
          <field name="PIN"></field>
        </shadow>
       </value>
      </block>


</category>

...
Other blocks / subcategories for display continue here
...

</category>
Here is the result:
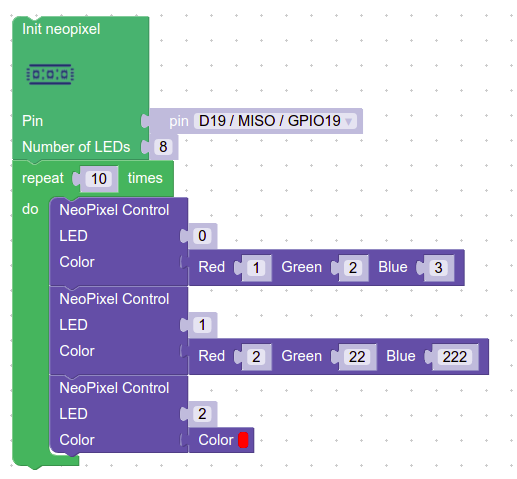
And one simple example:
References:
https://docs.micropython.org/en/latest/esp8266/tutorial/neopixel.html
https://github.com/rafaelaroca/BIPES_ui_testing/issues/19
Thanks for Philip / PicoKit for the suggestions.