Tech Details
How BIPES works
As Isaac Newton have said, “If I have seen further it is by standing on the sholders [sic] of Giants”. In that way, BIPES is as step futher thanks to the developments of great Open Source projects, specially Google Blockly and MicroPython or CircuitPython.
The diagram below gives a good overview of how BIPES works: using the Blockly block programming language from Google, we are able to program with standard and custom blocks. Next, Blockly itself automatically generates Python code, which BIPES sends to the target hardware using WebSockets and the WebREPL protocol, which is natively supported by MicroPython.
The program is copied and run on the board, so you can even disconnect or close the browser, that the program will continue running. However, the program is not saved – for that, use the Files option to send / receive files from the boards.
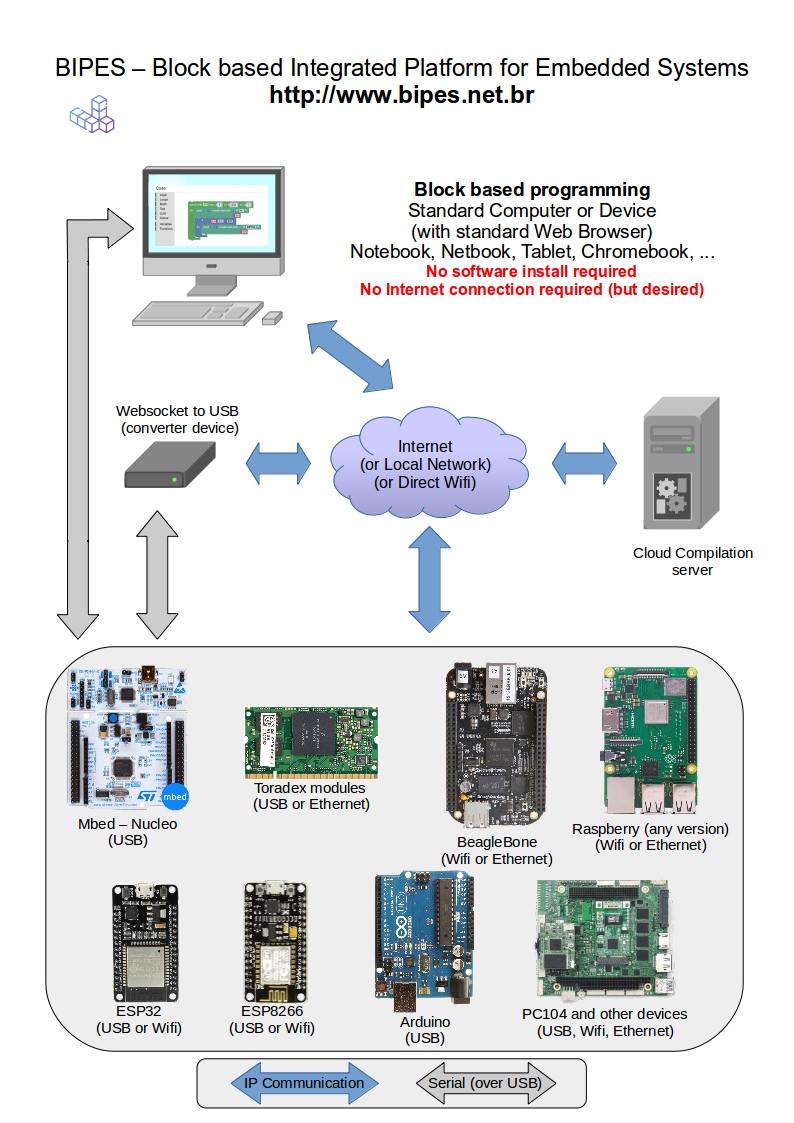
BIPES is fully open source, licenced under the GNU Public Licence (GPL), and is still in development, but already usable. It can generate Python or MicroPython code and run it on an embedded device in miliseconds, or even use a cloud scheme to compile C code generated from blocks and deploy to the hardware. The following table shows some supported hardware (some boards were already tested or are work in progress). BIPES architecture allows virtualy any hardware or IOT device to be programmed and monitored.
Use with ESP32, ESP8266 and similar dev boards
To use ESP32 and ESP8266 and similar boards, it is first necessary to load MicroPython firmware into the boards. Go to the official MicroPython website, select the correct firmware for your board, and download it.
After downloading the correct MicroPython firmware, flash it on the board. There are several ways of doing this. If you don’t want to use the terminal, you can download and use uPyCraft. Using uPyCraft, you can use the menu Tools -> Burn Firmware, and then select the board and the downloaded firmware. If the firmware upload is ok, you will be able to interact with the MicroPython shell right from uPyCraft.
If you prefer the terminal, you can flash the boards using esptool. Adafruit has great instructions about flashing it. Link to instructions. The links above will help you get MicroPython on your ESP board.
After the ESP board is running MicroPython, you have to enable WebREPL server, so that the board can be accessed and programmed using WebSockets. For that, connect to the board using an USB cable and open a serial terminal. You can use uPyCraft just after burning the firmware for this. When you access the Python shell and see >>>, simply type:
import webrepl_setup
Follow the instructions to enable WebREPL, and set a password. Next access BIPES, then connect to the network created by MicroPython, which is something similar to MicroPython-*. Go to BIPES Console, and on the host, type ws://192.168.4.1:8266/. Click Connect, and you should get MicroPython shell over wifi! By the way, the wifi password is micropythoN, and the console password is the one you typed minutes ago. From now on, you can build your program and run it using blocks!
Note, that connecting directly to the board running MicroPython will disconnect you from other Wifi Access Point, limiting your Internet Access. However, you can configure your board to connect directly to an Access Point. Use these commands for that:
import network
sta_if = network.WLAN(network.STA_IF); sta_if.active(True)
sta_if.connect("", "")
The commands above will connect the board to the Internet using AP_name with the given password. You can check the IP the board has been configured with using the command: sta_if.ifconfig()
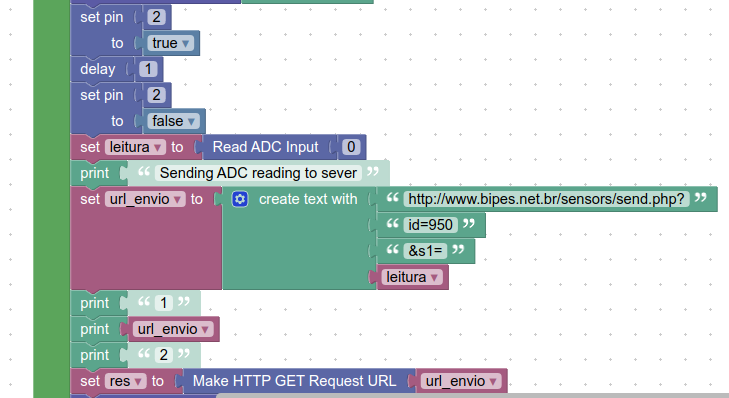
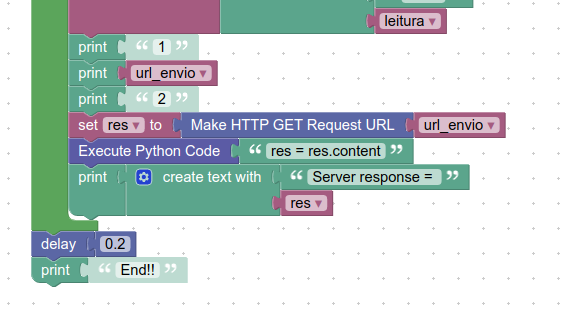
The figures below show an example of how to read the Digital to Analog Converter of ESP8266 or ESP32, while the LED blinks, and send the read value to the cloud using and IOT service and view the data in real time! The IOT tab of BIPES allows the collected data to be seen in a real time graph, historic graph, table view, or even export the data.
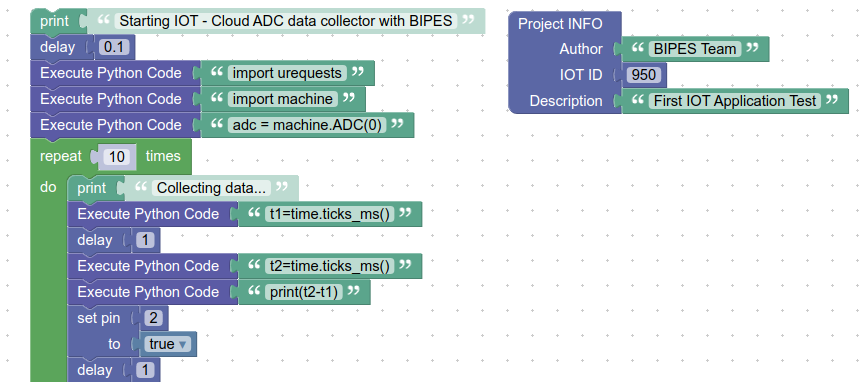
BIPES allows programs to be easily shared! If you want to view, run, or edit the program from the figure, simple access this link: http://bipes.net.br/beta2/ui/#rqq47n
For more information about MicroPython, use help() on the console.
Use with Linux based devices
This instructions applies to any Linux based device! It can be a Raspberry Pi, a BeagleBone, Toradex Board or even a PC! The key is to use SocketServerWebREPL, which gives a Python console over WebSocket to BIPES, allowing the blocks to be converted into Python code and run on the target machine, over network.
Fist download and execute SocketServerWebREPL. Using a terminal, issue the following commands:
git clone https://github.com/rafaelaroca/SocketServerWebREPL.git
cd SocketServerWebREPL
python socketserverWebREPL.py
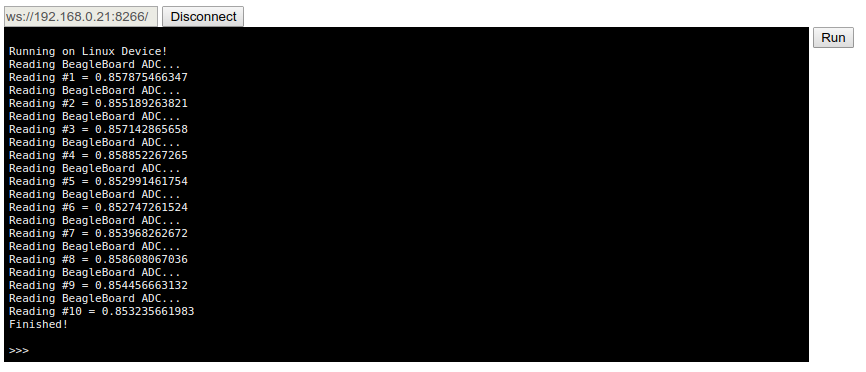
Next, go to BIPES and build your program by blocks. Then go to the Console tab, type the correct IP and port of your Linux device, and connect. Next, simply click Run, and the program will be converted into Python, sent to the device and executed. The output can be seen on the terminal. You can execute SocketServerWebREPL on your local machine, and connect to localhost, so testing is easier.
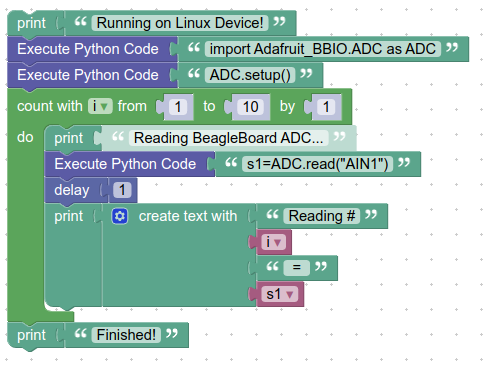
The following figures show an example program made with BIPES and its output on the console when Run button was clicked. Note that even when blocks for a given functionality are still not available, a custom Python command can be used using “Execute Python Code” block. In this example, we read the BeagleBone Black ADC even without having blocks for it!
Security alert: note that when SocketServerWebREPL is running, anyone on your network can access the device and send Python commands. Please, be alert of the environment you use / test the device. Soon, we will add authentication to SocketServerWebREPL.
P.S.: The mentioned commands also works on Windows and MAC!
Use with MBed devices
MBed devices can be used with BIPES thanks to MicroPython implementation for it. There are some ready to use MicroPython firmwares for MBed devices – NUCLEO-32, NUCLEO-64, NUCLEO-144 and DISCOVERY boards by boochow.
To use, first go to blog.boochow.com/micropython-firmware-for-mbed-boards, select a firmware, download it, extract and connect the MBed board to your PC. Then, simply copy the .bin file to the MBed USB Disk. My STM32nucleo, for example, shows as NODE_F446RE thumb drive.
After copying the firmware, your MBed Serial port should have a working MicroPython console/shell. You can test it with any terminal emulation program. On Windows, PuTTY can be used. On Linux, test it with minicom. You can use dmesg or lsusb commands to check the serial port associeted with your MBed board.
minicom -D /dev/ttyACM0 -b 115200
After accessing the shell, try to press ENTER sometimes to see the Python prompt >>>. If you see it, you have MicrPython running on your MBed device. Play with it! 😉
You can check your MicroPython / board version with the command machine.reset().
>>> machine.reset()
MicroPython v1.9.4-691-g4f25a8b-dirty on 2018-12-02; NUCLEO-F446RE with STM32F4x
Type "help()" for more information.
>>>
Next, lets use SerialWebSocketServer bridge to give WebSocket access to the MBed board! Open a terminal, with mBed connected to USB and run the commands:
git clone https://github.com/rafaelaroca/SerialWebSocketServer.git
cd SerialWebSocketServer/
python serverSerial.py
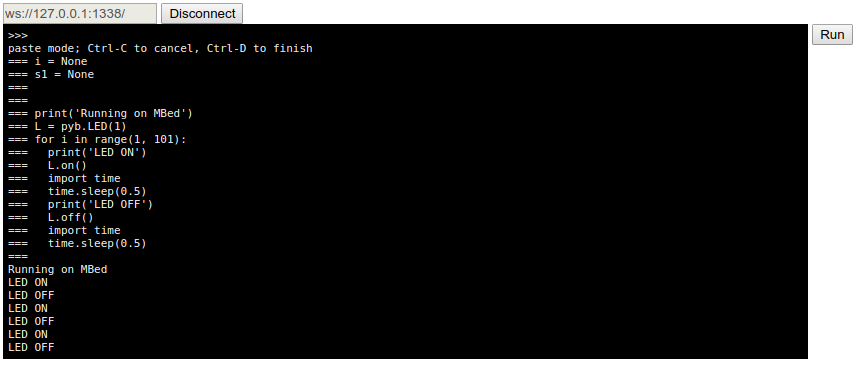
Ready! Now access BIPES, build your blocks. Go to Console, type the IP of the machine with MBed connected to the USB port ad running SerialWebSocketServer, and click Connect. Next you can click Run, and the program you run on MBed!
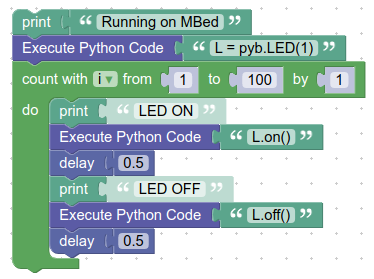
The figures below show an example to Blink MBed LED!
Note that SerialWebSocketServer can be on any machine. For example, you can have a Raspberry Pi board far from the development machine with an MBed connected to the Raspberry Pi USB Port. Then, you can run SerialWebSocketServer on Raspberry, and program, control and monitor MBed using SerialWebSocketServer on the Raspberry Pi as a bridge.
P.S.: The mentioned commands also works on Windows and MAC!
Use with BBC MicroBit
Install MicroPython firmware in MicroBit, as explained here.
Installation is really simple – simply download the firmware and copy to the MicroBit board drive. Then connect to the board using BIPES.
Useful documentation: microbit-micropython.readthedocs.io/introduction
Direct access to the USB port
A recent feature of Google Chrome (rafaelaroca.wordpress.com/access-serial-devices-directly-from-the-browser) allows direct access from the browser to the USB port. This (experimental) feature allows BIPES to directly communicate with BBC MicroBit, ESP32 ou ESP8266, mBed or any other device using the USB/Serial port!
This feature is already available on vanilla/standard Google Chrome, but Experimental Web Platform Features must be enabled in chrome://flags (#enable-experimental-web-platform-features).
After enabling this feature, and having the board with MicroPython firmware installed, simply access BIPES and play with it!
Blocks
Current blocks documentation here.
The basic infrastructure of BIPES is ready for the development of several programs for several target hardwares! We are doing many efforts to include practical blocks to be used by the community. While some blocks area not ready, keep in mind that we have a roadmap for developing blocks for several functions of each board, and advanced functionalities, such as OpenCV support for Linux devices, among other functions. Note that even if a block does not exist, you can invoke the desired Python command to do actions, such as in the examples above.
If you want to help us develop blocks, you are mostly welcome! No programming skills are needed, and you can use BlockFactory to easily build blocks. If you want, you can even access the entire BIPES blocks design in BlockFactory, and add new blocks to help us. Here is the link to the BIPES Blocks development at BlockFactory
What about Arduino?
Most BIPES functions are based on Python and MicroPython auto-generated code and sent to the boards using WebSockets. Unfortunately, Arduino does not support Python or MicroPython, so we address Arduino and other boards with a different approach. For Arduino, the Blocks are converted to C code, using Arduino calls and the generated code is sent to a cloud compilation server. After being compiled, the binary code generated is downloaded automatically and flashed to the Arduino Flash memory. Note that this functionality is under development!