Create new blocks#
To create new blocks for BIPES, it is necessary to modify a few files in the source code organized by category (displays, sensor, timings, etc), which defines:
static/page/blocks/blocks/*.js - the inputs, outputs, and appearance of each block (eg. network.js).
static/page/blocks/pythonic/*.js - the pythonic code generator for each block (eg. *network.js).
templates/page/blocks/definitions/*.md - the XML of the blocks and others elements attached to an unique id (eg. *network.md).
templates/page/blocks/devices/*.md - the unique ids of the XML elements in a list, per device (eg. *ESP32.md).
The pythonic code targets MicroPython, CircuitPython and Snek, with internal conditionals to switch the generated code per block.
The elements in the block definitions are the blocks, titles, labels and buttons, identified by an unique id so they can be used in multiple devices in a different selection of elements, for example, a block in the network category might be available in the ESP32 and ESP8266 toolbox but not in the Arduino UNO toolbox.
Tip
The Block Factory
allows to create the necessary code visually!
Just make sure to output the block definition as Javascript and the generator
stub as Python.
Full example#
To provide a guide on how to exactly include blocks, let’s create some for Neo Pixel RGB LED strip
Block definitions#
The four blocks we desire to implement are:
Init neopixel
Write/control neopixel
Colors by number
Colors by color
And , from all the existing categories, the Neo Pixel RGB Led strip blocks seems to fit better inside the “Displays” category.
So, at the end of static/blocks/blocks/displays.md include the desired block definitions:
//neopixel
Blockly.Blocks['neopixel_init'] = {
  init: function() {
         this.setColour(135);
         this.appendDummyInput()
             .appendField("Init neopixel");

 this.appendDummyInput()
           .appendField(new Blockly.FieldImage(
             "media/neopixel.png",
             55,
             55,
             "*"));

         this.appendValueInput("pin")
             .setCheck(null)
             .appendField("Pin");

         this.appendValueInput("number")
             .setCheck("Number")
               .appendField("Number of LEDs");

         this.setPreviousStatement(true);
         this.setNextStatement(true);
         this.setTooltip("Init NeoPixel on the specified pin");
  }
};

Blockly.Blocks['neopixel_write'] = {
  init: function() {
         this.appendDummyInput()
             .appendField(new Blockly.FieldLabelSerializable("NeoPixel Control"), "MS
G_NEOPIXEL");

         this.appendValueInput("address")
             .setCheck(null)
             .appendField("LED");

         this.appendValueInput("color")
             .setCheck("Number")
               .appendField("Color");

         this.setPreviousStatement(true);
         this.setNextStatement(true);

         this.setColour(230);
 this.setTooltip("NeoPixel");
 this.setHelpUrl("http://www.bipes.net.br");
  }
};

Blockly.Blocks['neopixel_color_numbers'] = {
  init: function() {
         this.appendDummyInput()
             .appendField("Red");
         this.appendValueInput("red")
             .setCheck(null);
         this.appendDummyInput()
             .appendField("Green");
         this.appendValueInput("green")
             .setCheck(null);
         this.appendDummyInput()
             .appendField("Blue");
         this.appendValueInput("blue")
             .setCheck(null);
         this.setInputsInline(true);
         this.setOutput(true, null);
         this.setColour(230);
 this.setTooltip("NeoPixel LED Color");
 this.setHelpUrl("https://bipes.net.br/wp/?page_id=177");
  }
};

Blockly.Blocks['neopixel_color_colors'] = {
  init: function() {
         this.appendDummyInput()
             .appendField("Color")
             .appendField(new Blockly.FieldColour("#ff0000"), "color");
         this.setInputsInline(true);
         this.setOutput(true, null);
         this.setColour(230);
 this.setTooltip("NeoPixel LED Color");
 this.setHelpUrl("https://bipes.net.br/wp/?page_id=177");
  }
};
With this, we have 4 blocks defined with the names:
neopixel_init
neopixel_write
neopixel_color_numbers
neopixel_color_colors
Note
These block names are very important and must be the same in the other files.
Generator stubs#
Now let’s program how Blockly will generate code, for that we will create some rules inside static/pages/blocks/pythonic/displays.js.
Note
We can even add auxiliary JavaScript functions to generate our Python code:
Blockly.Python['neopixel_color_numbers'] = function(block) {
  var value_red = Blockly.JavaScript.valueToCode(block, 'red', Blockly.JavaScript.ORDER_ATOMIC);
  var value_green = Blockly.JavaScript.valueToCode(block, 'green', Blockly.JavaScript.ORDER_ATOMIC);
  var value_blue = Blockly.JavaScript.valueToCode(block, 'blue', Blockly.JavaScript.ORDER_ATOMIC);

  var code = '(' + value_red + ',' + value_green + ',' + value_blue + ')';

  return [code, Blockly.JavaScript.ORDER_NONE];
};

function hexToRgb(hex) {
  // Expand shorthand form (e.g. "03F") to full form (e.g. "0033FF")
  var shorthandRegex = /^#?([a-f\d])([a-f\d])([a-f\d])$/i;
  hex = hex.replace(shorthandRegex, function(m, r, g, b) {
         return r + r + g + g + b + b;
  });

  var result = /^#?([a-f\d]{2})([a-f\d]{2})([a-f\d]{2})$/i.exec(hex);
  return result ? {
         r: parseInt(result[1], 16),
         g: parseInt(result[2], 16),
         b: parseInt(result[3], 16)
  } : null;
}

Blockly.Python['neopixel_color_colors'] = function(block) {
  var color = block.getFieldValue('color');
  var h = hexToRgb(color);
  var code = '(' + h.r + ',' + h.g + ',' + h.b + ')';
  return [code, Blockly.JavaScript.ORDER_NONE];
};


Blockly.Python['neopixel_init'] = function(block) {
  Blockly.Python.definitions_['import_machine'] = 'import machine';
  Blockly.Python.definitions_['import_neopixel'] = 'import neopixel';

  var value_pin = Blockly.Python.valueToCode(block, 'pin', Blockly.Python.ORDER_ATOMIC);
  var value_number = Blockly.Python.valueToCode(block, 'number', Blockly.Python.ORDER_ATOMIC);

  var code = 'np=neopixel.NeoPixel(machine.Pin(' + value_pin + '),' + value_number + ')\n';

  return code;
};

Blockly.Python['neopixel_write'] = function(block) {
  var value_address = Blockly.Python.valueToCode(block, 'address', Blockly.Python.ORDER_ATOMIC);
  var value_color = Blockly.Python.valueToCode(block, 'color', Blockly.Python.ORDER_ATOMIC);
  var code = 'np[' + value_address + ']=' + value_color + '\n';

  return code;
};
Template definitions and devices#
With the code ready, we need to add the XML representing the blocks to templates/page/blocks/definitions/displays.md and then include the blocks ids to the desired target devices’ toolboxes in templates/page/blocks/devices/*.md.
At templates/page/blocks/definitions/displays.md, include:
# NeoPixel LED Strip
<category name="NeoPixel LED Strip">
<label text="NeoPixel RGB LED Strip"></label>
<button text="%{DOCUMENTATION}: neopixel" callbackKey="loadDoc"></button>

# neopixel_init
<block type="neopixel_init">
  <value name="pin">
    <shadow type="pinout">
      <field name="Pin"></field>
    </shadow>
  </value>
  <value name="number">
    <shadow type="math_number">
      <field name="NUM">8</field>
    </shadow>
  </value>
</block>

# neopixel_color_numbers
<block type="neopixel_color_numbers">
 <value name="red">
  <shadow type="math_number">
    <field name="NUM">50</field>
  </shadow>
 </value>
 <value name="green">
  <shadow type="math_number">
    <field name="NUM">152</field>
  </shadow>
 </value>
 <value name="blue">
  <shadow type="math_number">
    <field name="NUM">220</field>
  </shadow>
 </value>
</block>

# neopixel_color_colors
<block type="neopixel_color_colors"></block>

# HSL_to_RGB
<block type="HSL_to_RGB">
  <value name="hue">
  <shadow type="math_number">
    <field name="NUM">204</field>
  </shadow>
  </value>
  <value name="saturation">
  <shadow type="math_number">
    <field name="NUM">70.8</field>
  </shadow>
  </value>
  <value name="lightness">
  <shadow type="math_number">
    <field name="NUM">52.9</field>
  </shadow>
  </value>
</block>

# neopixel_control
<block type="neopixel_control">
 <value name="address">
  <shadow type="math_number">
    <field name="NUM">0</field>
  </shadow>
 </value>
 <value name="color">
  <shadow type="neopixel_color_colors">
    <field name="PIN"></field>
  </shadow>
 </value>
</block>

# neopixel_write
<block type="neopixel_write"></block>
Notice that there is an additional NeoPixel LED Strip id to define a title
with label and a button to install a the neopixel documentation.
Finally, just include the defined ids to the desired devices’ toolboxes, for example, this simplified section of templates/page/blocks/devices/ESP32.md:
%{DISPLAYS}
NeoPixel LED Strip
neopixel_init
HSL_to_RGB
neopixel_color_numbers
neopixel_color_colors
neopixel_control
neopixel_write
end_category
Character display
char_lcd_init
char_lcd_clear
char_lcd_putstr
end_category
end_category
Warning
Remember to indirectly close any open <category> with end_category. If not, the parsing of the XML will fail miserably.
Note
You might have noticed along this example some tags in the format %{ID}, these
are internationalization tags and they are replaced by translated strings in the set language,
for more information about internationalization in BIPES, see the translating tutorial.
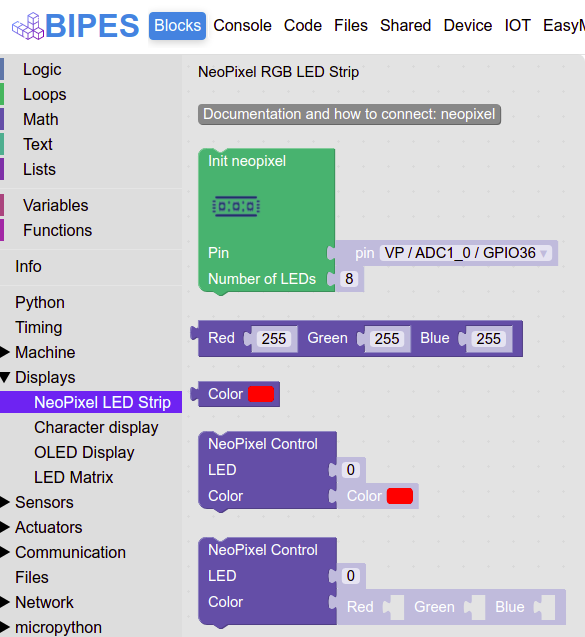
Result#
The expected toolbox:
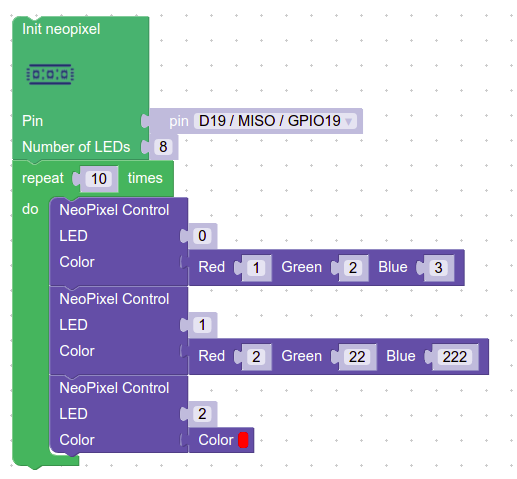
And an example using the new blocks:
Including new libraries, examples and documentation#
BIPES supports buttons in the toolbox which are used to install libraries to the device, load blocks examples and open external documentation.
The example or library source file must be publicaly available.
Note
You can store your library in the repository github.com/BIPES/examples-libraries, then get the raw link file (raw.githubusercontent.com/…).
Including a library#
Include the library to static/page/blocks/external.js#knownLibs with the format:
MyLibrary:{
  hostname:'https://PATH/TO/HOSTNAME/',
  file:'FILENAME.py'
},
And at the desired template definition include the button: .. code-block:: xml
<label text=”https://url/to/the/library/source/code”></label> <button text=”%{INSTALL_LIBRARY}: MyLibrary” callbackKey=”installPyLib”></button>
Note
The label is included to provide the file’s source, it is very important to give credit to the developer!
Including an example#
Include the library to static/page/blocks/external.js#knownExamples, with the format:
MyExample:{
  hostname:'https://PATH/TO/HOSTNAME/',
  file:'FILENAME.xml'
},
And at the desired template definition include the button:
<button text="%{LOAD_EXAMPLE}: MyExample" callbackKey="loadExample"></button>
Including documentation#
Include the library to static/page/blocks/external.js#knownDocs, with the format:
MyDoc:{
  hostname:'https://PATH/TO/HOSTNAME/',
  file:'FILENAME.xml'
},
And at the desired template definition include the button:
<button text="%{DOCUMENTATION}: MyDoc" callbackKey="loadDoc"></button>